- English
- Türkçe
How to Code a Rolling Ball with Swift?
Tags: Swift · UIKit · Tutorial · Animation · Interactive Components
Recently, I came across an amazing animation shared by a designer on Twitter. The little hint they gave about its internal mechanism was the spark for me. I had to do it too! Of course, in my own field and in my own style 😌
Thanks to @Designownow_ for the idea!
In this article, I’ll explain both how this design is built with Swift and the questions I asked myself during the process.
You can continue reading if you want to dive into all the details. Or, if you just liked this ball and want to use it in your project, you can simply scroll to the later parts of the article and quickly check out the GitHub repo.
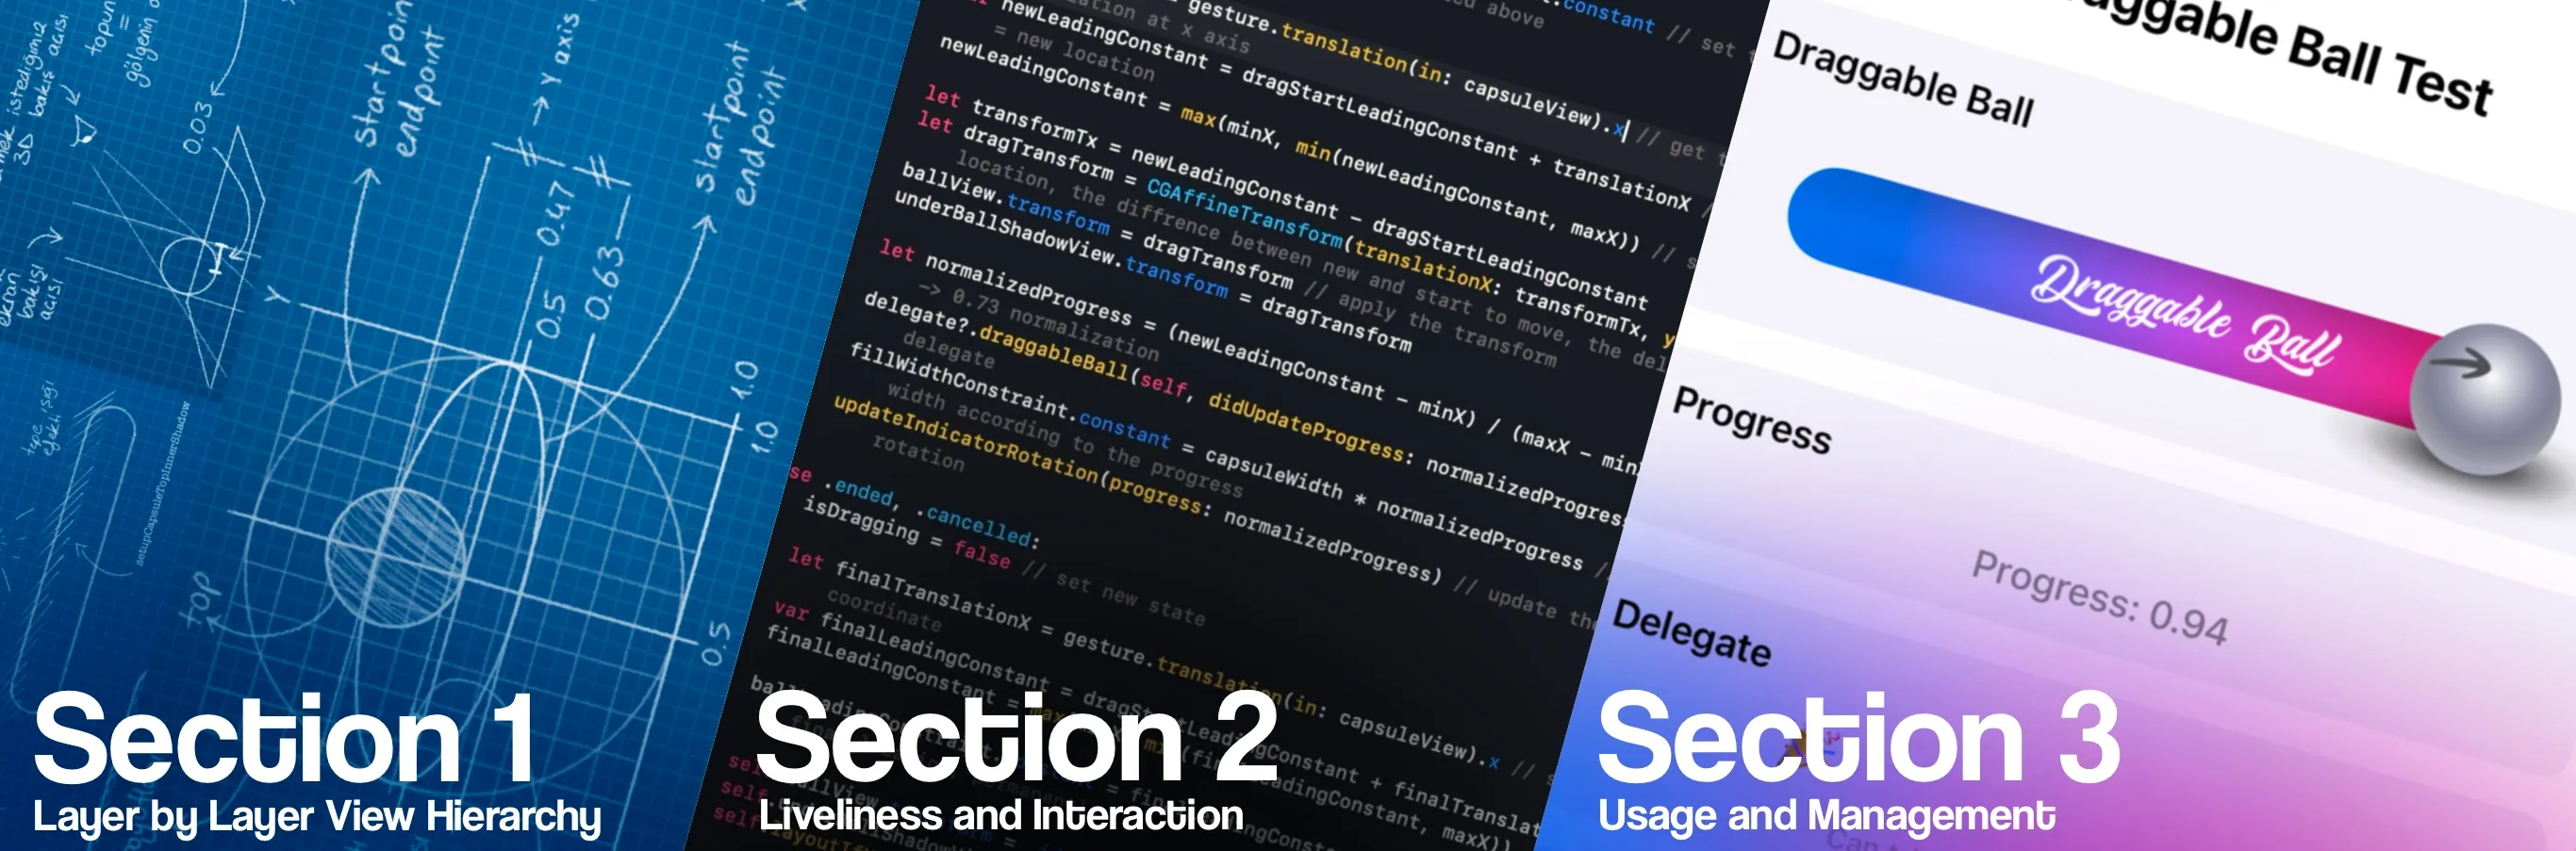
First, let’s take a look at the questions I asked myself while writing the sections:
📐 Section 1: Layer by Layer View Hierarchy
When we look at the whole structure, we can easily divide the elements we see into two in our minds: the capsule shape and the ball. But what about the shadows? The text? According to what will the rotating arrows spin? And what about the color gradient adjustments?
Which one is on top of which? Who takes reference from whom? And how exactly do they take that reference? We’ll answer these questions one by one.
⚡️ Section 2: Liveliness and Interaction
Here, we will bring the ball to life. But how? How will the user understand that they need to tap on it? What happens when they tap? What happens when they release? And what about when they drag it?
We’ll explore how all of these work in harmony without any glitches, flicker or awkward transitions.
🧩 Section 3: Usage and Management
By the time we get here, everything will be ready, and we’ll be able to access and change things in real time. We have one question and one answer: What should we make configurable? Everything.
📐 Section 1: Layer by Layer View Hierarchy
First, we should start by creating the shape of the capsule itself:
1 - capsuleView
This is the structure that defines the actual desired shape. The .masksToBounds parameter here is only for the capsule’s main outline: it contains the background, text, and shadow boundaries.
2 - fillView
Similarly, .masksToBounds also exists here, but in this case, the masking is triggered by the position of the ball, and the main animation takes place here. This way, the overall frame of the structure can be controlled separately from the animation variables.
3 - fillLabel
capsuleView = UIView()
capsuleView.layer.cornerRadius = capsuleHeight / 2
capsuleView.layer.masksToBounds = true
self.addSubview(capsuleView)

fillView = UIView()
fillView.layer.masksToBounds = true
capsuleView.addSubview(fillView)

fillLabel = UILabel()
fillLabel.text = self.fillText ?? "Capsule"
fillLabel.textAlignment = .center
fillLabel.textColor = self.fontColor

if let customFont = UIFont(name: fontName, size: 20) {
    fillLabel.font = customFont
} else {
    fillLabel.font = UIFont.systemFont(ofSize: 20, weight: .bold)
    print("Custom font '\(fontName)' not available, using system font")
}
fillView.addSubview(fillLabel)
capsuleHeight = 50
I define values like capsuleHeight at the top of the file, which makes it easier to control size, proportions, and similar settings. This also allows me to make quick changes without getting lost in the clutter of the code. You can take a look by checking out the GitHub link. 👀
private let capsuleHeight: CGFloat = 50
private let ballSize: CGFloat = 70
private lazy var padding: CGFloat = {
   (capsuleHeight - ballSize) / 2
}()

private let indicatorSize = CGSize(width: 150, height: 150)
private let maxIndicatorRotationAngle: CGFloat = .pi

private var capsuleView: UIView!
private var ballView: UIView!
private var fillView: UIView!
example from the top parts of the file
We should add the background gradient colors to fillView as well. Keep the colors array defined up top so it’s easy to access. For sizing the gradientLayers, check out updateGradientFrames in the Extra section below. (see GitHub)
fillGradientLayer = CAGradientLayer()
fillGradientLayer.colors = self.fillGradientColors
fillGradientLayer.startPoint = CGPoint(x: 0.0, y: 0.5)
fillGradientLayer.endPoint = CGPoint(x: 1.0, y: 0.5)

if fillView != nil {
    fillView.layer.insertSublayer(fillGradientLayer, at: 0)
}
for now, we can add an expression like
fillGradientLayer.frame = capsuleView.boundsinside. Later, we’ll add a function namedupdateGradientFramesto handle these collectively.
4 - Shadows
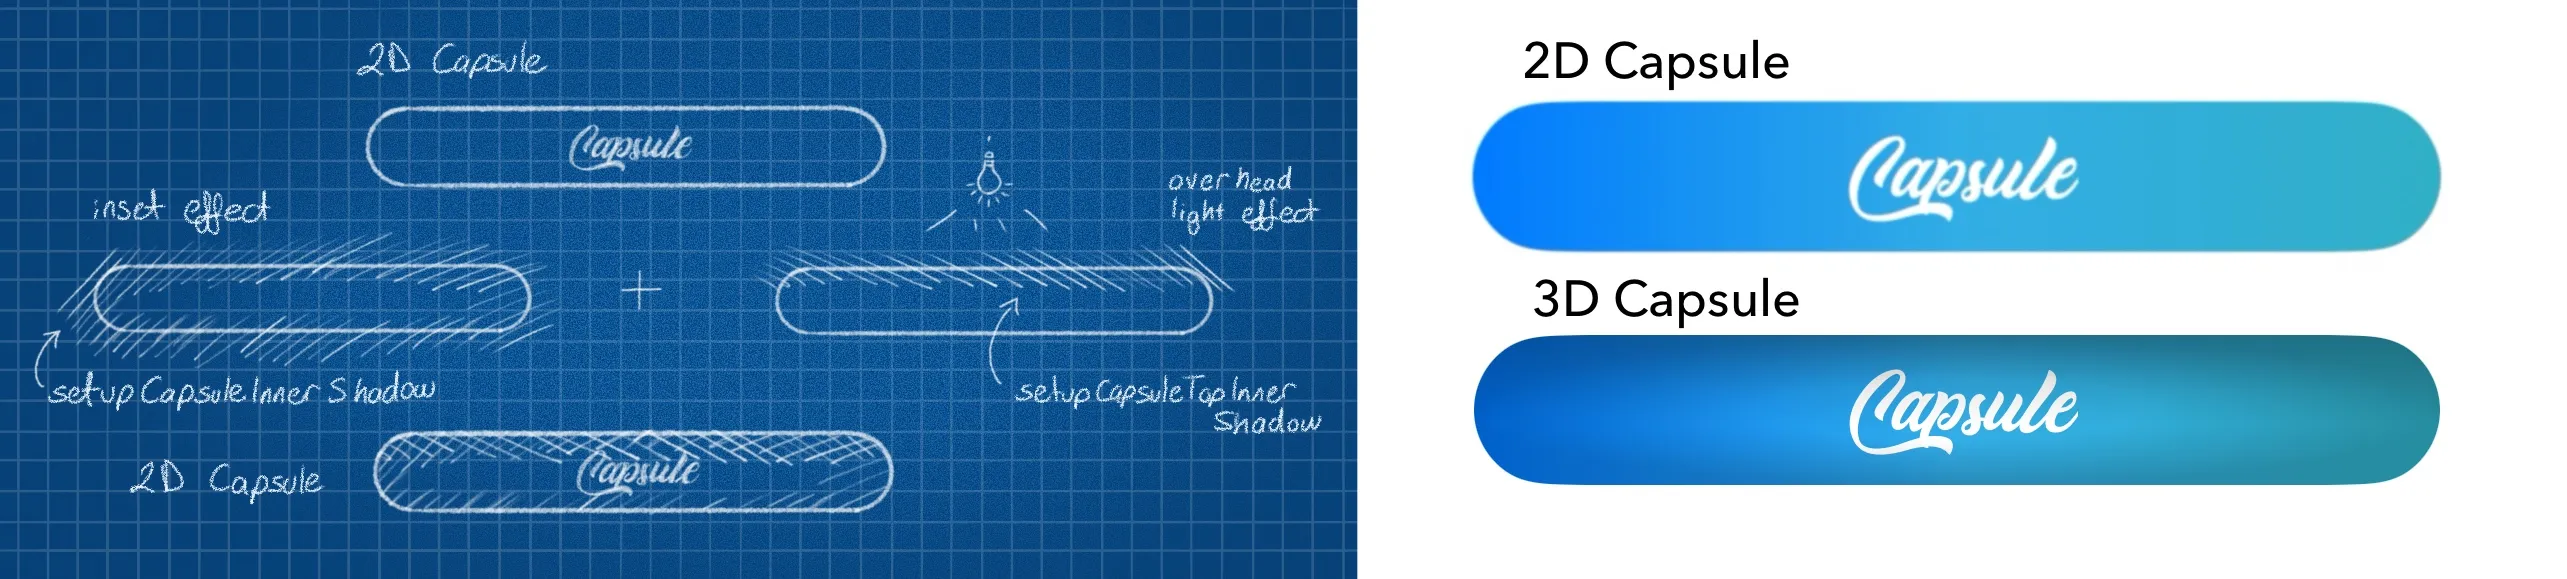
There are 2 shadows applied to the capsule:
- one is the top-edge shadow, resembling light coming from above,
- the other is applied to all edges, creating an inset effect as if light is hitting from all sides.
When creating the ball’s shadow, we’ll take a closer look at the gradient settings.
These shadows give the impression that the ball is moving inside a groove on the screen. However, a full 3D effect is not always desirable, so we’ll add an extra intensity adjustment to fine-tune it later.
And yes, I know the ball’s shadow and the inset effect are not 100% aligned, but for now the control is in my hands—and this way it looks nice to me 😈. I’ve taught you how to fish, now you can take control on your own computer 😌
private func setupCapsuleInnerShadow() {
    let shadowGradient = CAGradientLayer()
    shadowGradient.frame = capsuleView.bounds
    shadowGradient.cornerRadius = capsuleHeight / 2
    shadowGradient.masksToBounds = true
    shadowGradient.type = .radial

    //transparent center to dark edges
    shadowGradient.colors = [
        UIColor.clear.cgColor,
        UIColor.black.withAlphaComponent(cornerInnerShadowAlpha * 0.5).cgColor,
        UIColor.black.withAlphaComponent(cornerInnerShadowAlpha).cgColor
    ]
    shadowGradient.locations = [0.4, 0.7, 1.0]
    shadowGradient.startPoint = CGPoint(x: 0.5, y: 0.5) // center
    shadowGradient.endPoint = CGPoint(x: 1.0, y: 1.0) // edges

    if showCornerInnerShadow {
        fillView.layer.addSublayer(shadowGradient)
        capsuleInnerShadowLayer = shadowGradient
    }
}
capsuleInnerShadowLayer.frame = capsuleView.bounds capsuleTopInnerShadowLayer.frame = capsuleView.bounds
Now we can start building the ball itself. Let’s list the elements used here in a hierarchy as well.
1 - underBallShadowView
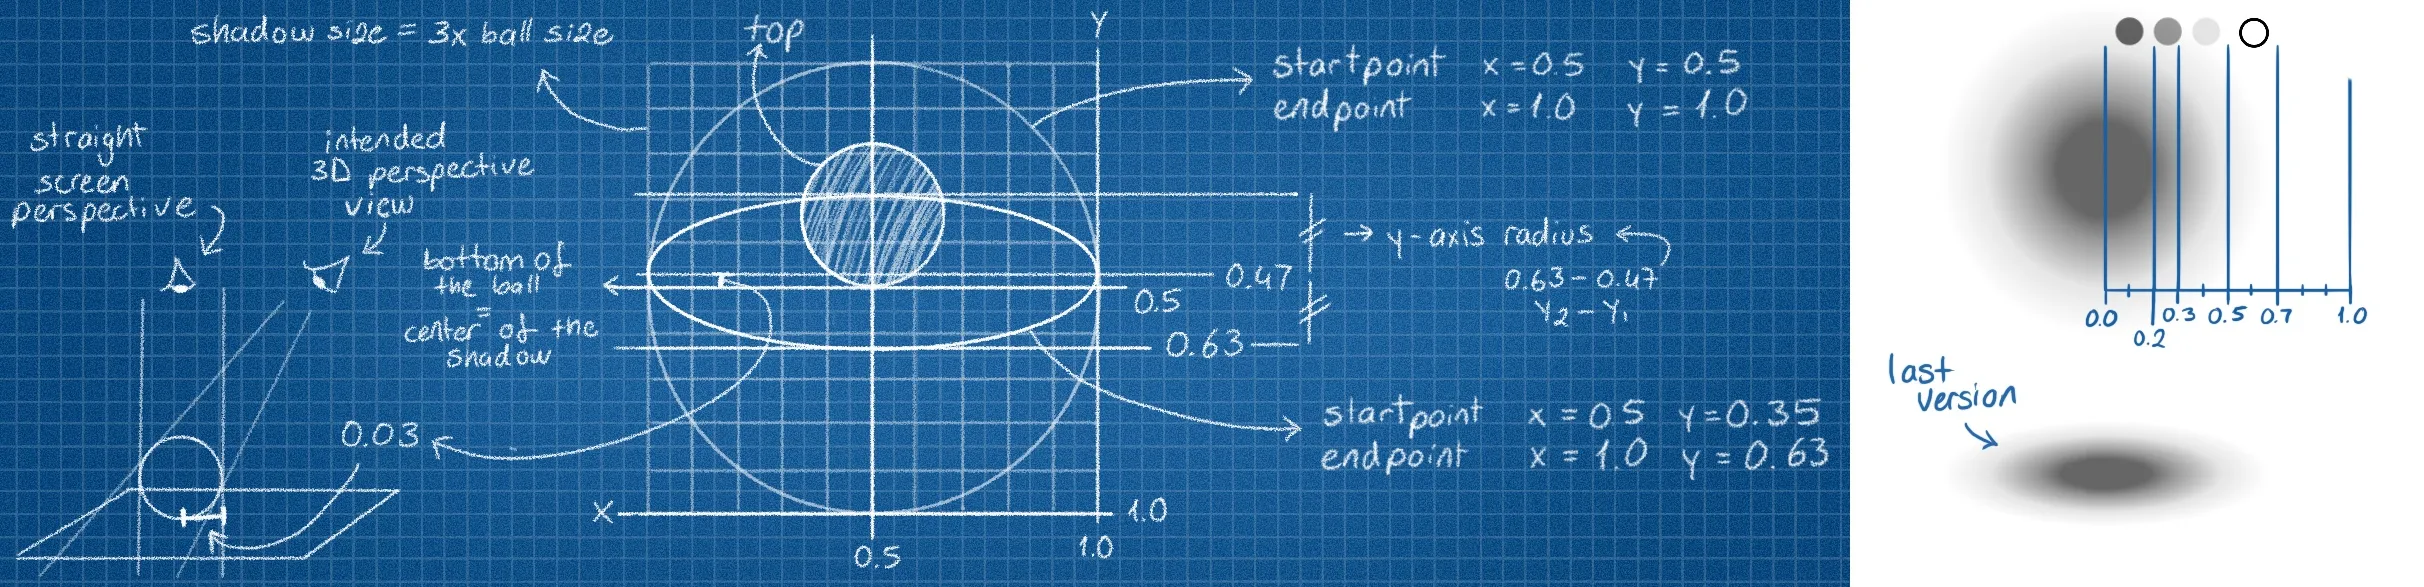
We want the ball’s shadow to be larger than the ball itself, so we define its height and width as 3 times the ball’s size. Later, we’ll apply these to underBallShadowView with a constraint, but for now, it’s better to keep the related parts together.
let shadowHeight = ballSize * 3
let shadowWidth = ballSize * 3
underBallShadowView = UIView()
self.addSubview(underBallShadowView)
setupBallShadowGradient()
So far we’ve only set up the view for the shadow gradient—next we need to give it shape and color.
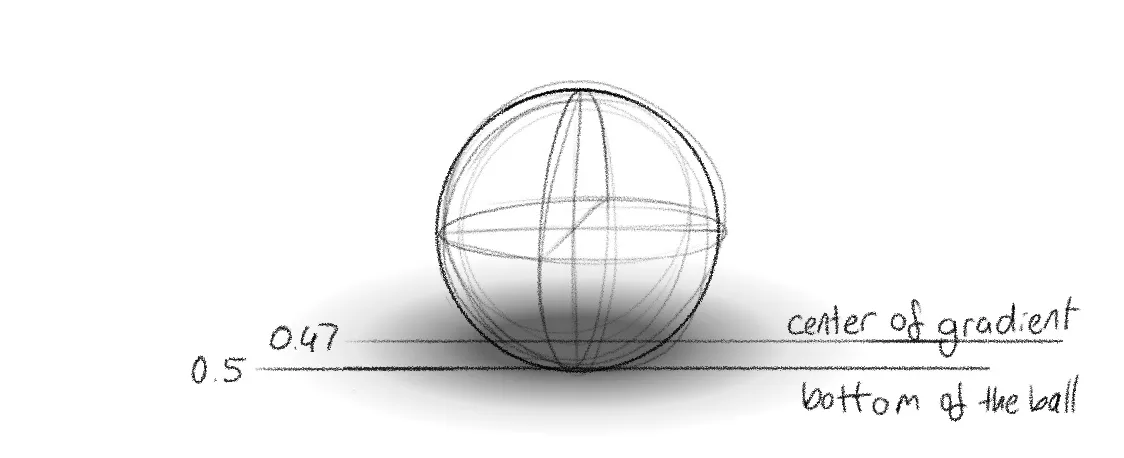
Here’s a closer look at how the gradient works: when creating the transitions, each element in the colors array is paired with one in the locations array. For instance, in the code snippet below (see picture below), from 0.0 to 0.2 we’re using colors[0], and from 0.2 to 0.3 it switches to colors[1]. The color shifts between them are smooth and seamless.
We can position the shadow roughly like this:
underBallShadowView.centerXAnchor.constraint(equalTo: ballView.centerXAnchor),
underBallShadowView.centerYAnchor.constraint(equalTo: ballView.bottomAnchor),
underBallShadowView.widthAnchor.constraint(equalToConstant: shadowWidth),
underBallShadowView.heightAnchor.constraint(equalToConstant: shadowHeight),
after adding ballView*
To fine-tune things, we need to adjust the inner positioning of the gradientLayer. Since the gradient is defined as .radial (circular), the .startPoint acts as the center—right now, it’s the coordinate where the darker color begins to spread. The .endPoint marks where the spread finishes, and you can think of the distance between them as the radius of a circle or ellipse.
What we’re aiming for is an ellipse that’s narrow vertically but wide horizontally. Its position should sit slightly above the ball, because we want to create a subtle 3D effect.
private func setupBallShadowGradient() {
    shadowGradientLayer = CAGradientLayer()
    shadowGradientLayer.type = .radial
    let shadowBaseColor = UIColor.black
    shadowGradientLayer.colors = [
        shadowBaseColor.withAlphaComponent(0.6).cgColor, // center color
        shadowBaseColor.withAlphaComponent(0.4).cgColor,
        shadowBaseColor.withAlphaComponent(0.1).cgColor,
        shadowBaseColor.withAlphaComponent(0.00).cgColor, // edges color
        UIColor.clear.cgColor
    ]
    shadowGradientLayer.locations = [0.2, 0.3, 0.5, 0.7] // center -> edge
    shadowGradientLayer.startPoint = CGPoint(x: 0.5, y: 0.47) // center coordinates
    shadowGradientLayer.endPoint = CGPoint(x: 1.0, y: 0.63) // edge coordinates

    if underBallShadowView != nil {
        underBallShadowView.layer.addSublayer(shadowGradientLayer)
    }
}
shadowGradientLayer.frame = underBallShadowView.bounds
By shifting the gradient’s starting point on the y-axis from 0.5 (the middle of the view) to 0.47, we nudge it upward by 3%. It might seem tiny, but it makes a huge difference to how you perceive the shape. The reason for this tweak is that we want a sphere 🪩, not just a circle ⭕️. If you look at a sphere from above, you don’t see the point where it touches the ground—and the same goes for our shadow.(bottom left corner of the image above)
After moving the center of the gradient, the next step is deciding how far it should spread. Horizontally, we want a much wider shape, so it can extend all the way to 1.0 (x-axis radius 0.5). Vertically, though, we want it tighter, so we set it to 0.63, which gives us a radius of 0.18.
2 - ballView
Now it’s time to build the ball. Just like before, we set up a view and turn on .masksToBounds, letting it serve as a mask for the colors and arrows that will appear on top.
ballView = UIView()
ballView.layer.cornerRadius = ballSize / 2
ballView.layer.masksToBounds = true
self.addSubview(ballView)
setupBallGradient()
private func setupBallGradient() {
ballGradientLayer = CAGradientLayer()
ballGradientLayer.type = .radial
ballGradientLayer.colors = [
UIColor(red: 250/255.0, green: 250/255.0, blue: 250/255.0, alpha: 1.0).cgColor, // center color
UIColor(red: 149/255.0, green: 149/255.0, blue: 169/255.0, alpha: 1.0).cgColor,
UIColor(red: 129/255.0, green: 129/255.0, blue: 149/255.0, alpha: 1.0).cgColor,
UIColor(red: 149/255.0, green: 149/255.0, blue: 159/255.0, alpha: 1.0).cgColor,
UIColor(red: 210/255.0, green: 210/255.0, blue: 240/255.0, alpha: 0.9).cgColor // edge color
]
ballGradientLayer.locations = [0.0, 0.5 ,0.7, 0.9, 1.2] // center -> edge
ballGradientLayer.startPoint = CGPoint(x: 0.5, y: 0.35)
ballGradientLayer.endPoint = CGPoint(x: 1.1, y: 0.95)
if ballView != nil {
ballView.layer.addSublayer(ballGradientLayer)
}
}ballGradientLayer.frame = ballView.bounds
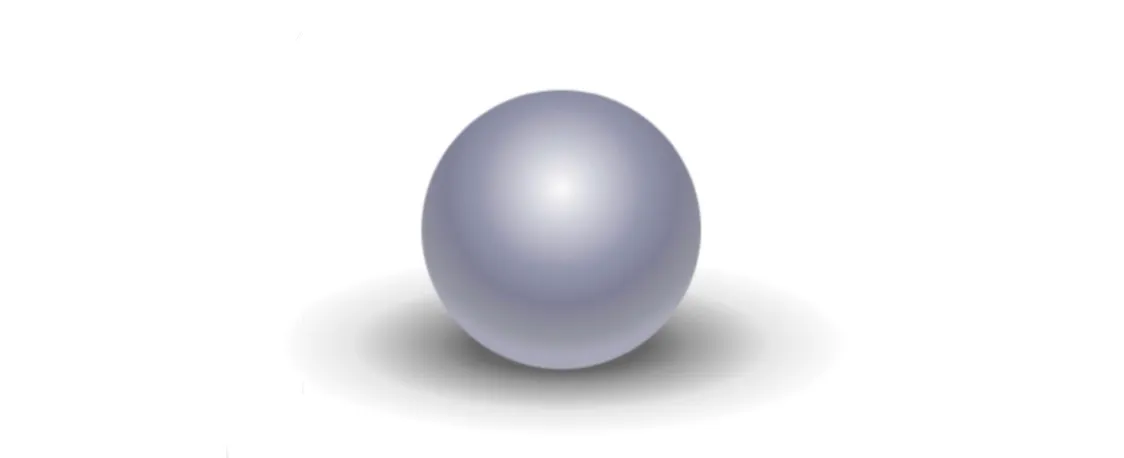
As you can see, the colors include shades of gray that are warm, cool, dark, and light, and the positioning uses different numbers. These aren’t numbers coming from anywhere or calculated — they just looked good to me. I decided through trial and error, with plenty of blood, sweat, and tears 😌.”

Feel free to tweak the values based on your own aesthetic taste, but if you stick with mine, your ball will end up looking like this:
3 - indicatorImageView
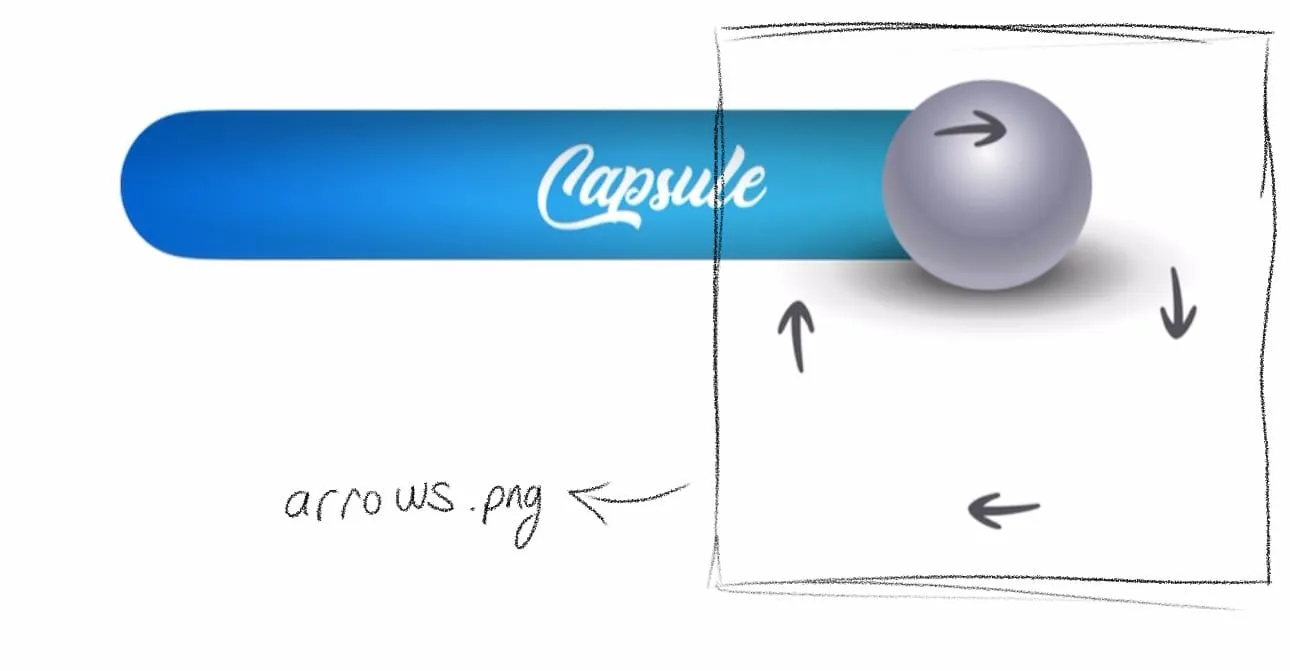
The last layer is the rotating arrows. I say “arrows” (plural), because while the user only sees one arrow on the ball, behind the scenes it works a little differently. We use a .png image that contains 4 arrows, and just like with underBallShadowView, we place it beneath the ball. The difference here is that this time we attach it to the ball itself, so it stays within the scope of .maskToBounds.
indicatorImageView = UIImageView()
indicatorImageView.image = UIImage(named: "arrows")
indicatorImageView.contentMode = .scaleAspectFit
ballView.addSubview(indicatorImageView) // added to ball not view itself
private func updateIndicatorRotation(progress: CGFloat) {
let rotationAngle = progress * maxIndicatorRotationAngle
indicatorImageView.transform = CGAffineTransform(rotationAngle: rotationAngle)
}We set
maxIndicatorRotationAngle = .pi. This lets us rotate the progress by π and apply it directly to the image. You’ll see this function used often later on.

if
ballView.masksToBounds = false, you’ll get an image like this
You can dive into all the constraint details on the GitHub page. What really matters here are the dynamic ones—the constraints that sync with finger movement and reflect the motion:
ballLeadingConstraint: controls the ball’s left edge -> initially aligned with the capsule.fillWidthConstraint: controls the fill width inside the capsule -> starts at 0.
Both of these should be defined as global properties at the top of the file, since multiple functions will need to adjust them.
// Constraints to be modified by gesture
ballLeadingConstraint = ballView.leadingAnchor.constraint(equalTo: capsuleView.leadingAnchor, constant: padding)
ballLeadingConstraint.isActive = true

fillWidthConstraint = fillView.widthAnchor.constraint(equalToConstant: 0)
fillWidthConstraint.isActive = true
Now that everything is in place, it’s time to make the ball move.
⚡️ Section 2: Liveliness and Interaction
The first step is figuring out what we’ll need:
1) Dragging the ball -> UIPanGestureRecognizer 👆………………👆
2) Tapping the ball -> UITapGestureRecognizer 👆
private func setupGestureRecognizer() {
  panGestureRecognizer = UIPanGestureRecognizer(target: self, action: #selector(handlePanGesture(_:)))
  ballView.addGestureRecognizer(panGestureRecognizer)

  let tapGestureRecognizer = UITapGestureRecognizer(target: self, action: #selector(handleTapGesture(_:)))
  ballView.addGestureRecognizer(tapGestureRecognizer)

  ballView.isUserInteractionEnabled = true
}
1.1) What happens when the ball is dragged?
- The ball needs to follow the finger—that part is obvious. But the real question is: how? To figure that out, we’ll need to answer a few more questions. 🤨
@objc private func handlePanGesture(_ gesture: UIPanGestureRecognizer) {
    guard let capsuleView = self.capsuleView else { return }

    let capsuleWidth = capsuleView.bounds.width
    let minX = padding // 0% progress
    let maxX = capsuleWidth - ballSize - padding // 100% progress

    guard maxX > minX else { return } // precaution
First, we store the frame data in variables so we know the boundaries of movement.
1.1.1) What should happen when we start touching the ball? -> case .began:
- Record the
dragstatus so every function knows a drag is in progress. - Stop any active
timers to prevent other animations from firing during the drag. (thetimerwe’re pausing here will later be used for the hint mechanic—this prevents conflicts) - Save the current positions of all the
views so that the drag can begin smoothly from the latest state.
💡 The use of “.layer.presentation” is key here. To avoid sudden jumps or flickering, we need to track the live position.
case .began:
    isDragging = true // Set dragging state and stop the hint timer when user starts dragging
    stopHintTimer() // stop the which give feedback to usesr

    if ballView.layer.animationKeys()?.isEmpty == false { // if there is active animation
        let currentBallConstant = ballView.layer.presentation()?.frame.origin.x ?? ballLeadingConstraint.constant // Get the current live position
        let currentFillWidth = fillView.layer.presentation()?.bounds.width ?? fillWidthConstraint.constant // Get the current live fill width
        let finalIndicatorTransform: CGAffineTransform
        if let presentationTransform = indicatorImageView.layer.presentation()?.transform {
            finalIndicatorTransform = CATransform3DGetAffineTransform(presentationTransform) // Get thcurrent indicator live transform
        } else {
            finalIndicatorTransform = indicatorImageView.transform // get the normal trasnform, if canaccess the live one
        }
        ballView.layer.removeAllAnimations() // remove all other animaitions form views.
        fillView.layer.removeAllAnimations()
        indicatorImageView.layer.removeAllAnimations()
        underBallShadowView.layer.removeAllAnimations()
        ballLeadingConstraint.constant = currentBallConstant
        fillWidthConstraint.constant = currentFillWidth
        indicatorImageView.transform = finalIndicatorTransform
        /// if there is active animation, set the live position to Constraint.constant,
        /// for example if we intrupt an animation, froze it at began of touch and set that 'livevalue to our drag start value.
        /// this prevents animations from overlapping
        self.layoutIfNeeded()
    }
    dragStartLeadingConstant = ballLeadingConstraint.constant // set the drag start value from with the values you updated above
We’ll look into the timer and delegate methods later
1.1.2) What happens while dragging the ball? -> case .changed:
- Take the finger’s x-axis movement relative to the capsule and apply it to the ball’s position.
- Set boundaries so the ball can’t move outside the capsule. ⛔️
- Update the capsule’s background and the ball’s shadow dynamically with the new position. And don’t forget to rotate the arrows on the ball to match its movement.
case .changed:
    let translationX = gesture.translation(in: capsuleView).x // get the current drag translation at x axis
    var newLeadingConstant = dragStartLeadingConstant + translationX // start + drag = new location
    newLeadingConstant = max(minX, min(newLeadingConstant, maxX)) // set boundaries

    let transformTx = newLeadingConstant - dragStartLeadingConstant
    let dragTransform = CGAffineTransform(translationX: transformTx, y: 0) // not new location, the diffrence between new and start to move, the delta
    ballView.transform = dragTransform // apply the transform
    underBallShadowView.transform = dragTransform

    let normalizedProgress = (newLeadingConstant - minX) / (maxX - minX) // like 73% -> 0.73 normalization
    delegate?.draggableBall(self, didUpdateProgress: normalizedProgress) // notify delegate
    fillWidthConstraint.constant = capsuleWidth * normalizedProgress // set the fill width according to the progress
    updateIndicatorRotation(progress: normalizedProgress) // update the indicator rotation
1.1.3) What happens when the ball is released or the touch is cancelled? -> case .ended, .cancelled:
- Update the drag status again.
- Lock the final positions of each object with permanent
constants, and reset any temporarytransforms back to their original state. - Then we can take care of delegate callbacks and set up the timers.
case .ended, .cancelled:
    isDragging = false // set new state

    let finalTranslationX = gesture.translation(in: capsuleView).x // set the final coordinate
    var finalLeadingConstant = dragStartLeadingConstant + finalTranslationX
    finalLeadingConstant = max(minX, min(finalLeadingConstant, maxX))

    ballLeadingConstraint.constant = finalLeadingConstant // move the ball to the final location, permanently

    self.ballView.transform = .identity // set back to normal
    self.underBallShadowView.transform = .identity // set back to normal
    self.layoutIfNeeded() // UI done

    let finalProgress = self.getCurrentProgress() // its get progress from position of ballLeadingConstraint according to capsule
    self.delegate?.draggableBall(self, didUpdateProgress: finalProgress) // notify delegate
    checkProgressThresholdsAndNotifyDelegate(progress: finalProgress) // notify delegate

    // Check progress and manage timer after drag animation completes
    self.checkProgressAndManageTimer()
default:
    break
}

2.1) What happens when the ball is tapped?
- I want the user to feel that the ball is alive and movable—and every interaction with it should reinforce that. For example, when the ball is tapped, giving it a little bounce tells the user: “Keep playing with me, I’m a moving object, I’m alive!”
This liveliness effect should also show up when the ball first appears, even before it has moved at all. Right from the start, the ball should whisper: “Touch me! 👆” . That’s what the ‘hint’ functions you see in the code are for. We’ll take a closer look at them later in the article. For now, though, notice how the starters and stoppers are positioned in the code—this prevents the animations from clashing. Think of them as a little sneak peek from the future 😌
@objc private func handleTapGesture(_ gesture: UITapGestureRecognizer) {
    stopHintTimer() // Stop hint animation
    performTapHintAnimation() /// Start tap animation
}
There are two hint mechanisms: one that loops continuously under the right conditions (performSimpleHintAnimation), and another that only triggers when tapped. Let’s start by looking at ‘performTapHintAnimation’, the one that fires on tap.
What’s the goal? A little wiggle 🫨. We can repeat a small motion by feeding it a few manual values.
But which direction should it move? First ask: where is the ball right now? Normally, we want it to nudge forward—since that’s the direction we expect the user to drag. But if the ball is already at the far end, then it should wiggle backward. That also sells a nice illusion: the capsule edge feels like a wall, and the ball “bounces” off it. Keep this case in mind when implementing the animation.
private func performSimpleHintAnimation() {
    // Don't perform hint animation if user is actively dragging
    guard !isDragging else { return }

    // Use tolerance for floating-point comparison instead of exact equality
    guard abs(getCurrentProgress()) < progressTolerance else { return }

    guard let capsuleView = self.capsuleView,
            capsuleView.bounds.width > 0 else { return }

    let capsuleWidth = capsuleView.bounds.width
    let minX = padding
    let maxX = capsuleWidth - ballSize - padding

    let startConstant = ballLeadingConstraint.constant
    let startFillWidth = fillWidthConstraint.constant

    let hintDistance = (maxX - minX) * hintAnimationAmount
    let targetConstant = startConstant + hintDistance

    let normalizedProgress = (targetConstant - minX) / (maxX - minX)
    let targetFillWidth = capsuleWidth * normalizedProgress

    // Animate with keyframes: Start -> Forward -> Back -> Forward -> Back
    UIView.animateKeyframes(withDuration: 1.4, delay: 0, options: [.calculationModeLinear, .allowUserInteraction], animations: {
        // First forward movement (0-20%)
        UIView.addKeyframe(withRelativeStartTime: 0.0, relativeDuration: 0.2) {
            self.ballLeadingConstraint.constant = targetConstant
            self.fillWidthConstraint.constant = targetFillWidth
            self.updateIndicatorRotation(progress: normalizedProgress)
            self.layoutIfNeeded()
        }

        // Back to start (20-40%)
        UIView.addKeyframe(withRelativeStartTime: 0.2, relativeDuration: 0.2) {
            self.ballLeadingConstraint.constant = startConstant
            self.fillWidthConstraint.constant = startFillWidth
            self.updateIndicatorRotation(progress: 0.0)
            self.layoutIfNeeded()
            }

        // Second forward movement (50-70%)
        UIView.addKeyframe(withRelativeStartTime: 0.5, relativeDuration: 0.3) {
            self.ballLeadingConstraint.constant = targetConstant
            self.fillWidthConstraint.constant = targetFillWidth
            self.updateIndicatorRotation(progress: normalizedProgress)
            self.layoutIfNeeded()
        }

        // Final return to start (70-100%)
        UIView.addKeyframe(withRelativeStartTime: 0.7, relativeDuration: 0.3) {
            self.ballLeadingConstraint.constant = startConstant
            self.fillWidthConstraint.constant = startFillWidth
            self.updateIndicatorRotation(progress: 0.0)
            self.layoutIfNeeded()
        }
    }, completion: { [weak self] _ in
        // Check progress after animation completes
        self?.checkProgressAndManageTimer()
       })
}

🥳 Our ball just got even livelier!
🔎 Time to revisit the ‘hint’ section we skipped earlier. This is where we give the user feedback about the ball’s “aliveness.” Back to the same question: How?
- Similar to the tap animation, we want a subtle wiggle—and it should run on a periodic loop. Of course, that raises more questions.
When? ⏰
- It should start automatically as soon as the screen appears, so it grabs the user’s attention right away. And we want it to keep repeating on its own.
private var hintTimer: Timer?
private let hintTimerInterval: TimeInterval = 2.0 // 2 seconds between hint animations
first, we’ll need a timer that fires every 2 seconds
We trigger the initial animation inside layoutSubviews()—it runs whenever the layout finishes or changes—because each ball should have its own unique movement. The first animation fires as soon as the screen appears. Then, after one animation cycle, we call checkProgressAndManageTimer() to manage the hintTimer.
override func layoutSubviews() { // Called when the view's frame changes
    super.layoutSubviews()
    updateGradientFrames() // Update frames on subsequent layouts

    // Start hint animation only once after a delay to avoid layoutSubviews chaos
    if !hintAnimationCompleted && bounds.width > 0 {
        hintAnimationCompleted = true // Prevent multiple calls immediately
        DispatchQueue.main.asyncAfter(deadline: .now()) { [weak self] in
            self?.performSimpleHintAnimation()
            // Start the timer after the first animation
            DispatchQueue.main.asyncAfter(deadline: .now() + 1.4) { [weak self] in
                self?.checkProgressAndManageTimer()
            }
        }
    }
}checkProgressAndManageTimer(): The hint animation should only play when the ball is at the very beginning. After all, why tell the user “You can drag me” if they’ve already dragged it? They’ve already done what we wanted. So we check the ball’s drag progress and use that to decide—adding a small tolerance—so the animation only triggers when it’s right at the start.
// Checks the current progress and manages the timer accordingly
private func checkProgressAndManageTimer() {
    let currentProgress = getCurrentProgress()
    // Use tolerance instead of exact comparison - only start timer when very close to start
    if abs(currentProgress) < progressTolerance {
        startHintTimer() // Progress is essentially 0.0, keep the timer active
    } else {
        stopHintTimer() // Progress is greater than tolerance, stop the timer
    }
}

// Starts the hint timer
private func startHintTimer() {
    stopHintTimer() // Stop any existing timer first

    hintTimer = Timer.scheduledTimer(withTimeInterval: hintTimerInterval, repeats: true) { [weak self] _ in
        self?.performSimpleHintAnimation()
    }
}

// Stops the hint timer
private func stopHintTimer() {
    hintTimer?.invalidate()
    hintTimer = nil
}

// Cleanup timer when the view is deallocated
deinit {
    stopHintTimer()
}
-
Extra: Let’s talk about
updateGradientFrames(), which we call insidelayoutSubviews(). When building the UI, we created severalGradientLayers and added them where needed—but we didn’t size them yet. Once they’ve all been added to their respectiveviews, we call this function to align their frames. Normally, you could size them directly when creating each layer, but this safer approach works just as well.We trigger this function only after the full interface has been laid out, so the drawing boundaries are guaranteed to be correct.
private func updateGradientFrames() {
    // Update gradient layer frames if they exist and views have bounds
    if underBallShadowView != nil && underBallShadowView.bounds != .zero && shadowGradientLayer != nil {
        shadowGradientLayer.frame = underBallShadowView.bounds
    }
    if ballView != nil && ballView.bounds != .zero && ballGradientLayer != nil {
        ballGradientLayer.frame = ballView.bounds
    }
    if fillView != nil && capsuleView != nil && capsuleView.bounds != .zero && fillGradientLayer != nil {
        fillGradientLayer.frame = capsuleView.bounds
    }
    if capsuleView != nil && capsuleView.bounds != .zero && capsuleInnerShadowLayer != nil {
        capsuleInnerShadowLayer.frame = capsuleView.bounds
    }
    if capsuleView != nil && capsuleView.bounds != .zero && capsuleTopInnerShadowLayer != nil {
        capsuleTopInnerShadowLayer.frame = capsuleView.bounds
    }
}
🧩 Section 3: Usage and Management
🎉 Setup complete! Now it’s time to actually use our ball in projects. For example, we might want to display the current progress percentage, get notified when the drag finishes or when it resets back to the start. Maybe we’d like to set the percentage manually? Or even change the text, colors, or font inside it—all on the fly.
draggableBall = DraggableBall(frame: .zero, fillText: "Capsule", showCornerInnerShadow: true, showTopInnerShadow: true, cornerInnerShadowAlpha: 0.2, topInnerShadowAlpha: 0.2)You can start using it right away with your preferred settings
draggableBall.updateFont(name: "Cheetah Kick - Personal Use", size: 36, color: .white)
draggableBall.fillGradientColors = [ // didSet directly applies the changes
    UIColor.systemBlue.cgColor,
    UIColor.systemCyan.cgColor,
    UIColor.systemTeal.cgColor
]
And then, you can adjust anything you like
@objc func randomButtonTapped() {
    let randomProgress = CGFloat.random(in: 0...1)
    draggableBall.setProgress(randomProgress, animated: true)
}
Example in action
To make these changes—or directly access the ball’s state—we use accessor (get) and mutator (set) methods. Here are a few code examples, along with a full list of all available methods.
- To access the completion status:
isCompleted
public var isCompleted: Bool {
    return currentProgress >= 0.99
}- To change the label’s font, size, and color:
updateFont
// updates the font
public func updateFont(name: String, size: CGFloat = 20, color: UIColor? = nil) {
    fontName = name
if let customFont = UIFont(name: name, size: size) {
        fillLabel.font = customFont
    } else {
        fillLabel.font = UIFont.systemFont(ofSize: size, weight: .bold)
        print("Custom font '\(name)' not available, using system font")
    }

    // update the color if provided
    if let color = color {
        fontColor = color
        fillLabel.textColor = color
    }
}

// updates only the text color
public func updateFontColor(_ color: UIColor) {
    fillLabel.textColor = color
}- Adjust the presence and intensity of the shadows with:
updateCornerInnerShadow
public func updateCornerInnerShadow(show: Bool, alpha: CGFloat) {
    showCornerInnerShadow = show
    cornerInnerShadowAlpha = alpha
    if show && capsuleInnerShadowLayer == nil { // Create the shadow if needed
        setupCapsuleInnerShadow()
    } else if !show && capsuleInnerShadowLayer != nil {
        capsuleInnerShadowLayer?.removeFromSuperlayer()
        capsuleInnerShadowLayer = nil
    }
}

public func updateTopInnerShadow(show: Bool, alpha: CGFloat) {
    showTopInnerShadow = show
    topInnerShadowAlpha = alpha
    if show && capsuleTopInnerShadowLayer == nil { // Create the shadow if needed
        setupCapsuleTopInnerShadow()
    } else if !show && capsuleTopInnerShadowLayer != nil {
        capsuleTopInnerShadowLayer?.removeFromSuperlayer()
        capsuleTopInnerShadowLayer = nil
    }
}
Mutators (Setters)
- setProgress(animated)
- updateText()
- updateFont(name, size, color)
- updateFontColor()
- updateFontSize()
- updateFillGradientColors()
- updateCornerInnerShadow(show, alpha )
- updateTopInnerShadow(show, alpha)
- updateBallSize()
- updateIndicatorSize()
- updateIndicatorTopOffset()
- updateCapsuleHeight()
- updateCapsuleWidth()
Accessors (Getters)
- currentProgress
- isCompleted:
I added a test screen to the project so you can quickly try your designs and see how the code is used 🫡. The screenshot above is just a small snippet from the font section.
💡 Defining a delegate involves a bit of technical detail, but you can also copy the examples from GitHub and use them as-is.
We can make the changes we want using the methods above, but a delegate should also keep us updated about the ball’s state. In other words, the ball should be able to tell us things like:
- I’ve changed!
- I’m completed!
- I’m back at the start!
protocol DraggableBallDelegate: AnyObject {
    /// Notifies the delegate that the drag progress has been updated.
    /// - Parameters:
    ///   - draggableBall: The view that triggered the event.
    ///   - progress: The new progress value, from 0.0 to 1.0.
    func draggableBall(_ draggableBall: DraggableBall, didUpdateProgress progress: CGFloat)

    /// Notifies the delegate that the drag has reached the end (progress >= 1.0).
    /// - Parameter draggableBall: The view that triggered the event.
    func draggableBallDidReachEnd(_ draggableBall: DraggableBall)

    /// Notifies the delegate that the drag has returned to the start (progress <= 0.0).
    /// - Parameter draggableBall: The view that triggered the event.
    func draggableBallDidReturnToStart(_ draggableBall: DraggableBall)
}
Throughout the project, you may have noticed repeating lines like the ones below in the code we’ve written:
self.delegate?.draggableBall(self, didUpdateProgress: finalProgress) // notify delegates
checkProgressThresholdsAndNotifyDelegate(progress: finalProgress) // notify delegates
from inside the
handlePanGesture() case: .ended
-
didUpdateProgressfires whenever the ball’s progress percentage changes. Imagine we want to show the ball’s percentage in another label. Sure, we can grab it withcurrentProgress, but we don’t know when—or how often—to update the UI. That’s where delegates come in.Every time the ball changes, it should basically tell the label: “Hey, I’ve changed! Grab my current progress again and update yourself!”
private func checkProgressThresholdsAndNotifyDelegate(progress: CGFloat) {
    if progress >= 0.97 {
        delegate?.draggableBallDidReachEnd(self)
    } else if progress <= 0.03 {
        delegate?.draggableBallDidReturnToStart(self)
    }
}draggableBallDidReachEndfires when the ball gets to the end,draggableBallDidReturnToStartfires when the ball goes back to the beginning.
extension SingleBallAnimationVC: DraggableBallDelegate {
    func draggableBall(_ draggableBall: DraggableBall, didUpdateProgress progress: CGFloat) {
        progressLabel.text = String(format: "Progress: %.2f", progress)
    }

    func draggableBallDidReachEnd(_ draggableBall: DraggableBall) {
        print("Ball reached the end!")
        emojiLabel.text = "🎬"
    }

    func draggableBallDidReturnToStart(_ draggableBall: DraggableBall) {
        print("Ball returned to the start.")
        emojiLabel.text = "🎉"
    }
}
Example in action
🏁 The End
I had so much fun putting this together—coding, writing, and even sketching the images you saw along the way. 😌
👩🏻💻 Whenever I code, I’m always asking myself questions and trying to answer them. In this article, I tried to share those same questions with you, since my thought process while coding flows in exactly this way.
👩🏻🎨 As for the drawings—these are the kind of visuals I always wished I had during my own learning process. This time, I wanted to provide them for you directly. After all, we’re building something visual out of numbers and letters, and I think it’s important to quickly see what’s being created and how. Hopefully, it’s been helpful for you too.
If you have any questions about this post or just want to share your thoughts, feel free to drop me an email ✉️
👋🏻 Until next time!
github: zeynepmuslim/draggable-ball