- English
- Türkçe
Creating Smooth Path Morphing Animations in Swift
Tags: Path Morphing · UIBezierPath · Swift · Animation · Core Animation · Core Graphics
Smooth animations are all about synchronization. Normally, that means keeping timing and positioning values in sync. However, when transitioning between two vector objects with different structures, we need to establish that synchronization between the shapes themselves, which is a bit more challenging.

The difference you see above comes from synchronizing these factors:
- Node count
- Node positions
- Starting point
- Drawing direction
- Line - curve patterns
You can explore the entire process on GitHub. Both the initial and final versions of the animation use the exact same animate function. That means our real focus isn’t the animation code itself, but rather the state of the SVG and how we convert it into a UIBezierPath.
For all svg -> UIBezierPath conversions, we’ll use my own tool, Swift Paths.
static func animate(from shapeLayer: CAShapeLayer, to newPath: UIBezierPath, duration: CFTimeInterval = 0.8) {
    let morph = CAKeyframeAnimation(keyPath: "path")
    morph.values = [shapeLayer.path as Any, newPath.cgPath]
    morph.keyTimes = [0, 1]
    morph.duration = duration
    morph.timingFunctions = [CAMediaTimingFunction(name: .easeInEaseOut)]
    morph.fillMode = .both
    morph.isRemovedOnCompletion = false
    shapeLayer.path = newPath.cgPath
    shapeLayer.add(morph, forKey: "smoothMorph")
}
Before making any modifications, this is how the animation behaves with the original vector assets.
Different Node Counts
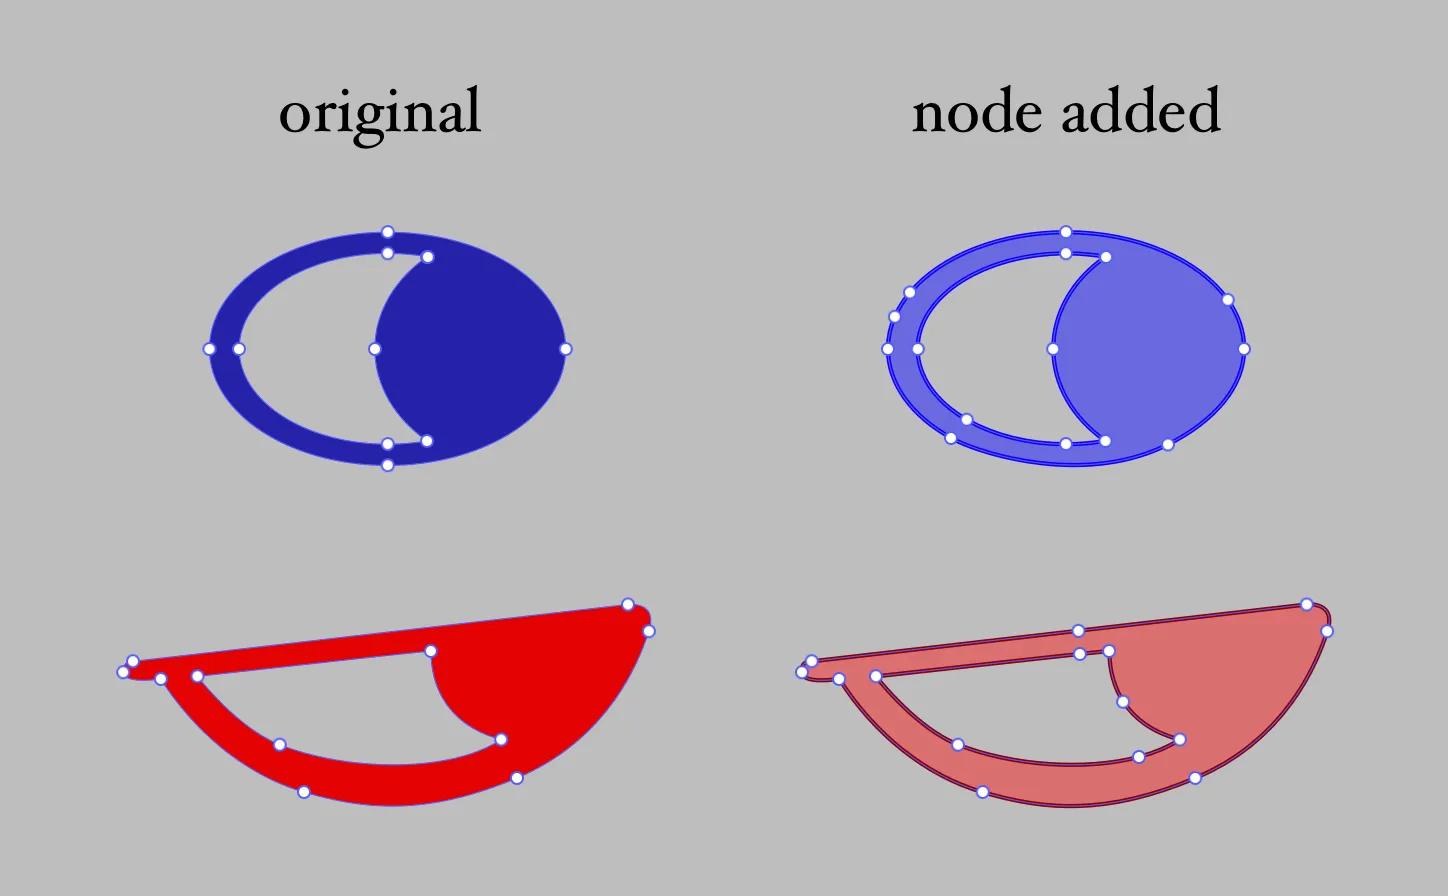
The first thing we need to do is equalize the node counts. Every closed path should have the same number of nodes, and those nodes should occupy roughly similar positions. This ensures that every node has a corresponding node to morph into.
For example, a single eye in our asset should be modified like this:
| Example Node Counts | Initial | Final |
|---|---|---|
| Red - Inner | 4 | 7 |
| Blue - Inner | 6 | 7 |
| Red - Outer | 7 | 8 |
| Blue - Outer | 4 | 8 |
This is the only part of the process that requires manual design work. You can do it directly in Sketch or Figma by simply clicking on a path with the vector tool and adding nodes. No graphic design experience is required.
The total node count may increase during this step. To avoid incorrect matches, it’s usually better to add extra nodes and keep their positions close to their counterparts. For example, since the blue shape had a node at the top, an additional node was added to the red shape as well.

Even after simply converting the updated SVGs into UIBezierPaths and applying the exact same animate function, the result already looks significantly better.
There are still a few issues, though. The hat rotates clockwise, the inner and outer paths of the right eye rotate in different directions, and the left eye folds into itself during the transition.
Fortunately, fixing these issues is fairly straightforward.
Drawing Patterns
civilHat.move(to: CGPoint(x: 123, y: 456))
civilHat.addCurve(...)
civilHat.addCurve(...)
civilHat.addCurve(...)
civilHat.close()
When Core Graphics matches paths, it doesn’t care about physical distance between nodes. The only thing it truly cares about is where .move() starts.
The drawing direction is determined by the order of subsequent addCurve() calls, not by how close nodes are to one another.
This means that no matter how carefully we position nodes in a design tool, if the drawing patterns don’t match in code, the offsets and self-intersections we’re seeing are unavoidable.
And in our example, there are many possible starting points and drawing directions.
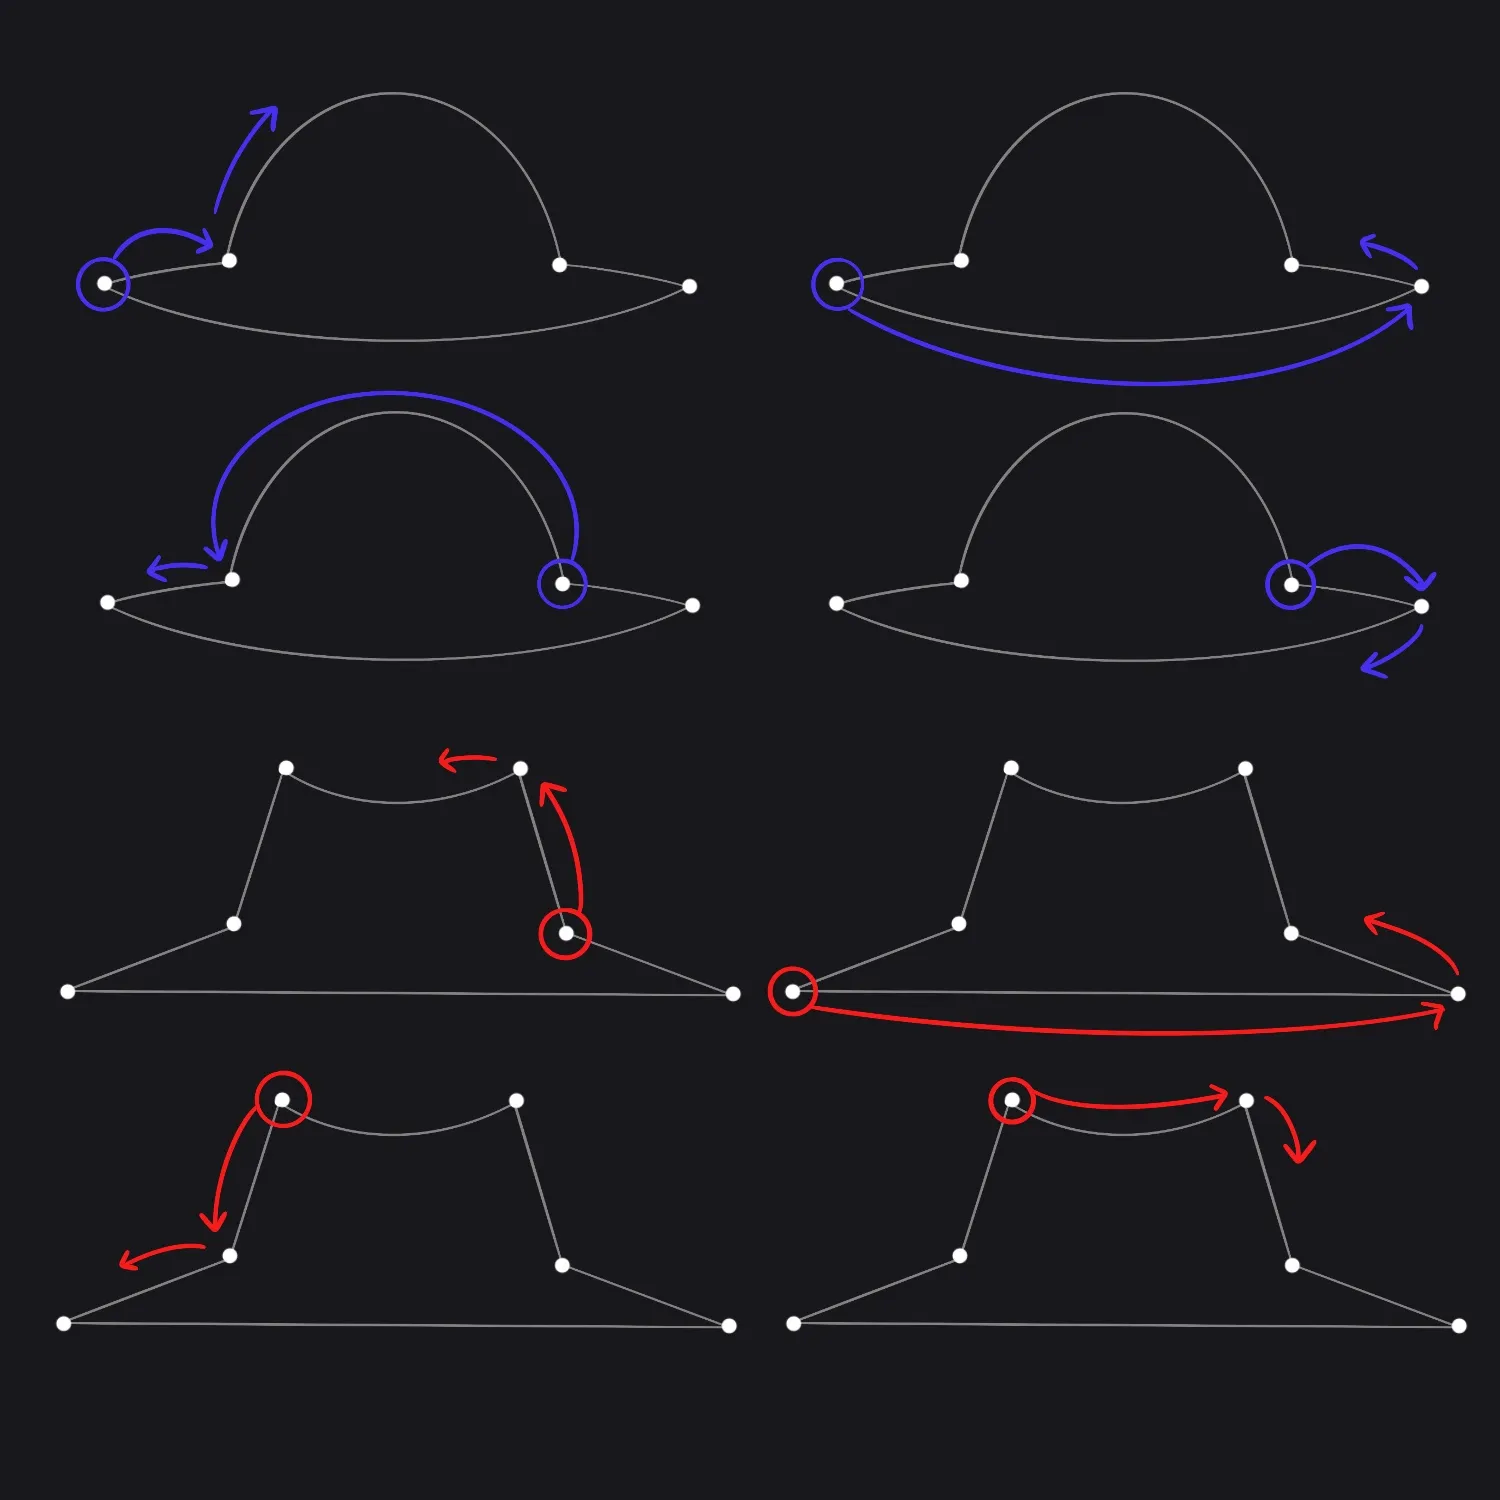
Both vectors must start from equivalent points and be drawn in the same direction. This applies not only to the main path, but also to every subpath.

To configure this, upload both SVG files into Swift Paths and navigate to the [animation helper] section at the bottom.
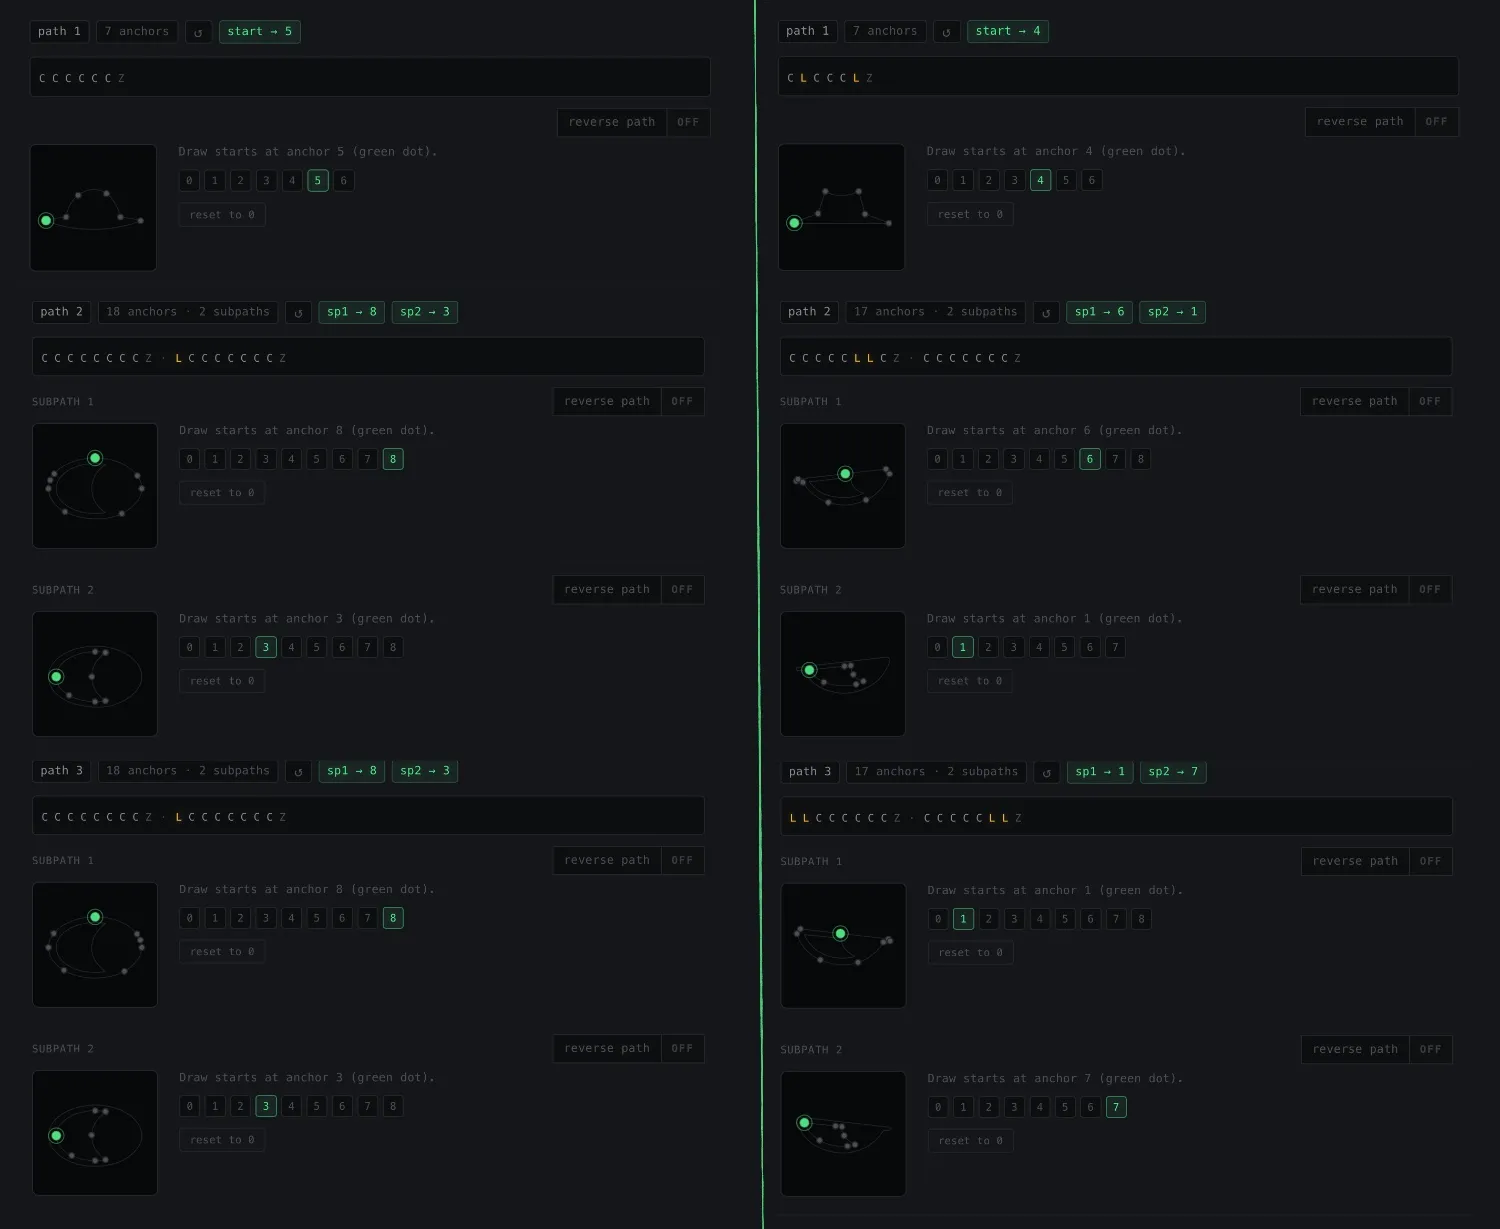
After loading both vectors and selecting matching starting points, we finally get the result we’re looking for.
For each vector object, output.swift can generate all paths as ready-to-use UIBezierPath() definitions in a single step.
Of course, we might not have reached the final result this quickly.
In this case, both shapes already share the same drawing direction, and most of the geometry consists of curves. If you encounter issues related to either of these factors, you can also use [Normalize L → C] and [Reverse Path] inside [animation helper] to further refine the morph.
Animation work always involves a bit of trial and error, but that’s also part of the fun.

I originally wanted to use this character animation in my party game app, Spy. Back then, I struggled quite a bit with these conversions. None of the existing tools offered the customization options I needed.
That’s ultimately how Swift Paths was born 😌
Multiple Morphs
To make the animation feel like a single cohesive transformation, we can define a separate animate() call for each path and trigger them simultaneously.
func civilToSpyMorph() {
    animate(from: civilRightEye, to: spyRightEye)
    animate(from: civilLeftEye, to: spyLeftEye)
    animate(from: civilHat, to: spyHat)
}

func spyToCivilMorph() {
    animate(from: spyRightEye, to: civilRightEye)
    animate(from: spyLeftEye, to: civilLeftEye)
    animate(from: spyHat, to: civilHat)
}
For more detailed positioning logic, implementation details, and all assets used in this article, feel free to check out the project on GitHub.
And if you’d like to help improve Swift Paths, I’d love to hear your feedback from a fellow developer’s perspective on GitHub.
github: zeynepmuslim/swift-path-morph